
How to Upload a same Video Twice on YouTube With Different Names

YouTube hosts millions of user-created videos for free on its servers. The video-sharing website only requires registration to upload a video and start a channel. YouTube runs a checksum to analyze videos for duplicates to avoid hosting the same video more than once. The process blocks videos with the same content regardless of having different file names or video titles. Users have to change the length of the video to bypass detection.

Instructions


    • 1
      Open a video editing program. Windows Movie Maker is included with Windows 7. To open it, click "Start," then "All Programs," and then "Windows Movie Maker."
    • 2
      Open a Windows Movie Maker project by selecting "Open Project" from the drop-down menu in the top right corner. If you did not edit the video in Windows Movie Maker or did not edit the video at all, click "Add videos or photos." Browse to the video, select it, and click "Open."
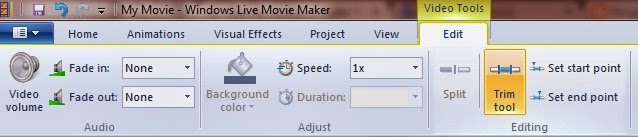
    • 3
      Reduce the video's length by clicking "Edit" and then "Trim Tool." A preview video will appear with two points at each end. Drag the points inward to trim. Click "Save Trim" when finished.
    • 4
      Lengthen the movie by adding a title or credits. Click the "Add Title" or "Add Credits" buttons to the right of "Snapshot." Edit the text by double-clicking on the text icon below the video timeline. You can trim the length of the title using Step 3.
    • 5
      Save the video by clicking "Save movie" in the top left corner and then selecting "For computer."
    • 6
      Upload the video to YouTube by signing in to your account and selecting "Upload." Browse to the new video file, and select it. Enter a new name for the video, and click "Save changes."

Comments

Popular posts from this blog

INSTALL CISCO VPN CLIENT ON WINDOWS 10 (32 & 64 BIT). FIX REASON 442

This article shows how correctly install Cisco VPN Client (32 & 64 bit) on Windows 10 (32 & 64 bit) using simple steps, overcome the ‘ This app can’t run on this PC ’ installation error , plus fix the Reason 442: Failed to enable Virtual Adapter error message . The article applies to New Windows 10 installations or Upgrades from earlier Windows versions and all versions before or after Windows 10 build 1511 .  To simplify the article, we’ve broken it into the following two sections: How to Install Cisco VPN client on Windows 10 (clean installation or upgrade from previous Windows), including Windows 10 build prior or after build 1511 . How to Fix Reason 442: Failed to enable Virtual Adapter on Windows 10 Figure 1. The Cisco VPN Client Reason 442: Failed to enable Virtual Adapter error on Windows 10 HOW TO INSTALL CISCO VPN CLIENT ON WINDOWS 10 (NEW INSTALLATIONS OR O/S UPGRADES) The instructions below are for new or clean Windows 10 inst...

How to create a Hirens Boot CD 15.2 USB Disk

Hiren’s BootCD (HBCD) is a bootable CD that contains a set of tools that can help users to fix their computer if their system fails to boot. More specifically, HBCD contains hardware diagnostic programs, partition tools, data recovery utilities, antivirus tools and many other tools to fix your computer problems.  I write this article because I use Hiren’s BootCD frequently to troubleshoot computer problems, specially when a computer doesn’t boot anymore due to a virus attack or due to a corrupted file system. In this article you will find instructions on how to put Hiren’s BootCD on a USB flash drive (stick) in order to troubleshoot computer problems in the future.

Internet Connection Sharing has been disabled by the Network Administrator. (Solved)

Problem: Logged in to computer with domain account has administrator privileges, and wanted to share my computer’s wifi to my mobile phone. When open the network sharing dialog, the dialog says: Internet Connection Sharing has been disabled by the Network Administrator.