Robots.txt contains the guidelines or rules for the bot-crawlers about how they will crawl and index your website or blog. Blogger allows to set some very basic SEO settings very easily from the dashboard. One of them is setting a custom robots.txt for your blogger.
When a robot search engine crawler is visiting a page or website, robots.txt is the first thing it looks for is the robots.txt file. As a Blogger user you now have the option to control what the search engine crawlers should follow and index from your website or blog.
Every blogger blog has a default robots.txt but with advanced changes in blogger you can change it according to your needs. In this post, you will know about the default robots.txt of blogger, how to add or edit a custom robots.txt for your blogger blog and some useful examples of robots.txt with an adsense friendly one. So let's get started.

That's the way to insert or edit custom robots.txt. Now let's see how to write a custom robots.txt for blogger.
The above example is an adsense friendly custom robots.txt for your blogger. Now we will explain what each line means here and what more you could add to your custom robots.txt.
As you see, all you need to is to add the link after the yourbloglink.blogspot.com. Now if you want to stop crawling posts from a particular year add
Then add the Disallow rules and Allow rules respectively. In place of Name of the bot you need to add the particular name(User agent) for your desired robot crawler (List of robot crawler).
When a robot search engine crawler is visiting a page or website, robots.txt is the first thing it looks for is the robots.txt file. As a Blogger user you now have the option to control what the search engine crawlers should follow and index from your website or blog.
Every blogger blog has a default robots.txt but with advanced changes in blogger you can change it according to your needs. In this post, you will know about the default robots.txt of blogger, how to add or edit a custom robots.txt for your blogger blog and some useful examples of robots.txt with an adsense friendly one. So let's get started.
Default Custom Robots.txt of Blogger Blog
Every time you create a blog in blogger a default robots.txt is created and until you change it by the setting is dashboard it remains same.
User-agent: Mediapartners-Google
Disallow:
User-agent: *
Disallow: /search
Allow: /
Sitemap: http://yourblogslink.blogspot.com/feeds/posts/default?orderby=UPDATED
It is same for each blog and it is adsense friendly. If this is able to satisfy your SEO need for the blog that you do not require to replace it by adding a custom one in by dashboard settings.
How to Add Custom Robots.txt in your Blogger Blog
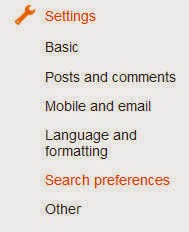
Follow these instructions below;- Go to your blogger dashboard > Settings > Search Preferences > Crawling and Indexing.
- Click 'Custom robots.txt' > click 'yes'.
- Paste you custom robots.txt. (An example is given below)
- Click 'Save changes' to save the custom robots.txt.
That's the way to insert or edit custom robots.txt. Now let's see how to write a custom robots.txt for blogger.
A Proper Custom Robots.txt in your Blogger Blog
The following example is a proper robots.txt for your blogger.
# robots.txt of mysite.blogspot.com thanks to atoz-networking.blogspot.com
User-agent: Mediapartners-Google
Disallow:
User-agent: *
Disallow: /search
Disallow: /p/*
Disallow: /view/*
Disallow: /?m=1
Disallow: /?m=0
Disallow: /*?m=1
Disallow: /*?m=0
Allow: /
Sitemap: http://yourblogslink.blogspot.com/feeds/posts/default?orderby=UPDATED
Sitemap: http://yourblogslink.blogspot.com/atom.xml?redirect=false&start-index=1&max-results=500
The above example is an adsense friendly custom robots.txt for your blogger. Now we will explain what each line means here and what more you could add to your custom robots.txt.
# robots.txt of mysite.blogspot.com thanks to atoz-networking.blogspot.com
User-agent: Mediapartners-Google
Disallow:
User-agent: *
Disallow: /search
Disallow: /p/*
Disallow: /view/*
Disallow: /?m=1
Disallow: /?m=0
Disallow: /*?m=1
Disallow: /*?m=0
Allow: /
Sitemap: http://yourblogslink.blogspot.com/feeds/posts/default?orderby=UPDATED
Sitemap: http://yourblogslink.blogspot.com/atom.xml?redirect=false&start-index=1&max-results=500
Tips for Writing a Custom Robots.txt for Blogger Blog
# robots.txt of mysite.blogspot.com thanks to atoz-networking.blogspot.com
This a comment line. You can add more and this will not affect you sites SEO or robots crawling what so ever. I suggest you to keep this line on if this post is helping you.User-agent: Mediapartners-Google
Disallow:
These lines are only for the adsense crawler. If you are or want to display adsense ads; this line allows the adsense crawler to visit all the pages of your site as per the adsense guideline. If it is not required you can simply remove them from the robots.txt. Then the adsense crawler will follow the instruction you have set for all the crawlers.User-agent: *
This is used for all the crawlers (except ones for which a separate rule is set, here the adsense crawler) and all instructions are written below it.Disallow: /search
This line indicates that any page with /search in the URL will not be crawled and indexed by the crawler. These line is very important for making your blog SEO friendly as it stops search engines to stop indexing label, search query, archive pages. Because they are not a unique page or URL and also to avoiding duplicate content.Disallow: /p/*
To block robots to crawl the pages for your blog. But if you want your pages to be indexed by crawler then just delete this particular line.Disallow: /view/*
Stops crawling of the blogger's %%% links. If you are using %%% views then just remove this line and if you are not using it them don't remove the line.Disallow: /?m=1
Disallow: /?m=0
Disallow: /*?m=1
Disallow: /*?m=0
These lines are here to stop robots crawling of mobile redirect pages. If you do not use them, you might see your blogs links in mobile search results have ?m=1 or ?m=0 with them. They are necessary to avoid the duplicate pages problem. If you are not facing these problems or if you don't need them you can remove them.Allow: /
After you adder the instructions for restricting crawling, these line tells the robots that other links in these blog are free to crawl and index.Sitemap: http://yourblogslink.blogspot.com/feeds/posts/default?orderby=UPDATEDSitemap: http://yourblogslink.blogspot.com/atom.xml?redirect=false&start-index=1&max-results=500
These lines basically indicates the links to you blog's site map(s). Replaceyourblogslink.blogspot.comwith your blog's URL. If you are using a custom dommain in your blogger blog, then use that URL.
More Expert Tips on Custom Robots.txt in Blogger
Now some additional tips for customizing the robots.txt for your blog.Prevent a Certain Page from Crawling and Indexing
For preventing a certain page, post or link in your blog all you need to do is to add a new disallow rule after User-agent and beforeAllow: / like this:-Disallow: /p/secret-page.html
Disallow: /2014/01/secret-post.htmlAs you see, all you need to is to add the link after the yourbloglink.blogspot.com. Now if you want to stop crawling posts from a particular year add
Disallow: /2014/* and posts from a particular month of the year add Disallow: /2014/01/*. As you see you can go nuts according to your needs.Adding Separate Instruction for a Particular Robot Crawler
If you want to add crawling instructions for a particular robot add this line:-User-agent : Name of the botThen add the Disallow rules and Allow rules respectively. In place of Name of the bot you need to add the particular name(User agent) for your desired robot crawler (List of robot crawler).
Adding More Sitemap
You can add multiple sitemaps in the robots.txt.Sitemap: http://yourblogslink.blogspot.com/feeds/posts/default?orderby=UPDATED is default for every blogger blog, but you can add more. For example: Sitemap: http://yourblogslink.blogspot.com/atom.xml?redirect=false&start-index=1&max-results=500; this is for the first 500 post for your blog. You can add more. Here are some useful links to understand blogger sitemaps.Stop robots to crawl the Entire Blog
Do not want the any robot. Then delete everything and use;User-agent: *Disallow: /Or stop a particular robot to crawl your blog, then use;User-agent: Name of the botDisallow: /Check and Analyze your Robot.txt
There are many tools available in the web for checking your robots.txt. But for checking how the google robots (i.e..Adsbot-Google, Mediapartners-Google, Googlebot) will crawl in your blog you should use google-webmaster's tool. For this; go to your website's webmaster dashboard > Crawl > Blocked URLs. Using it you can see how these robots works on your blog according to your specified robots.txt.Custom Robots Header Tags Settings in Blogger
Custom Robots Header Tags. This is really a handy tool which helps us to select which portion of our blog should be indexed and which should be protected from indexing in search results. This tool plays great role in our blog’s Search Engine Optimization. Using it properly can improve our blog ranking that helps us to gain more visitors from search engines and hence our blog page views will also increase. In this tutorial you will learn how to setup custom robots headers tags in blogger. Let’s see how to setup them.
Setup Custom Robots Header Tags
First enable this option from your blogger settings and then I’ll tell you how to use it.

- Log in to your blogger account.
- Now navigate to Setting >> Search Preferences
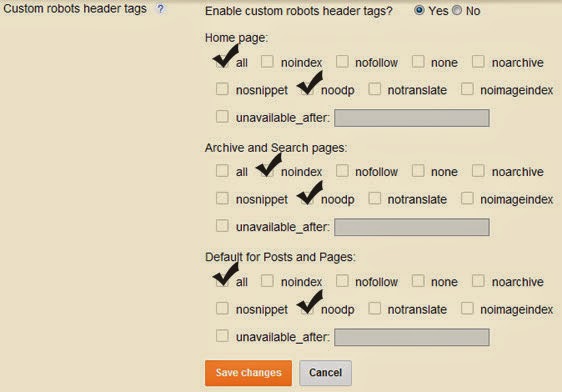
- Click on edit link under the Custom Robots Header Tags section as shown in below screenshot.
- Once you click on the edit link you will see many options. Simply tick on the options as shown in the below image.
- Now click on “”Save changes” button.
- You are done!
Comments