Before You Begin
To use the videoconference unit, a registered and active data outlet must be in the room. Several campus locations have active data outlets already installed. These include:
• Large auditoriums
• Some Enrollment controlled classrooms
• Dorm rooms
• Career Center interview rooms
• Some Enrollment controlled classrooms
• Dorm rooms
• Career Center interview rooms
Setup the Unit
Follow the steps below to setup the unit for videoconferencing:
- Place the monitor side of the videoconferencing unit face down onto a soft surface, exposing the ports on the back.
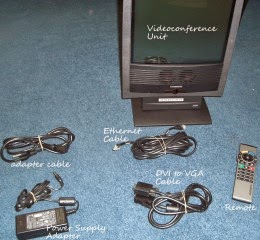
- Insert the Ethernet cable into the Ethernet port. Note: Do not insert this cable into the ISDN ports.

- Insert the power supply adapter cable into the power adapter, and then into the port for power.
- Stand the unit upright on a solid surface, such as a table.
- Connect the Ethernet cable to an active Andrew network outlet in the room.Note: Do not plug the cable into a phone line. It MUST be connected to a data outlet.

- Connect the power supply into a power outlet in the room.
- The unit will automatically power up. A green “on” light will appear in the lower left of the monitor. A video image of the room you are in will appear on the screen when complete.
- Move the Tandberg unit so that the camera is directed towards the subject.
- The unit has two addresses located on the screen:
- Global address (left) - Anyone on or off campus can call your unit using this address.
- Local address (right)- Anyone on the Pittsburgh or Qatar campus can call your unit using this address.
Initiating a Call
Before you begin, you will need the address of your unit. The unit has two addresses located on the screen:
• Global address (left) - Anyone on or off campus can call your unit using this address.
• Local address (right)- Anyone on the Pittsburgh or Qatar campus can call your unit using this address.
• Global address (left) - Anyone on or off campus can call your unit using this address.
• Local address (right)- Anyone on the Pittsburgh or Qatar campus can call your unit using this address.
- On the remote press the phone book button. The phone book menu displays.

- Use the arrow button on the remote to move down to the appropriate directory (e.g., Personal Units) and then select OK. The directory displays. Note: A phone book search capability is available by selecting the magnifying glass on the screen. Enter the entry you are looking for using the remote and then press OK key.

- Use the arrow button again to move down to the unit you would to call.
- On the remote, press the green telephone handset button.

- The videoconferencing unit will attempt to dial.
- Successful call - the menu bar will disappear and a status message will display the address that was entered.
- Unsuccessful call - (i.e., The menu bar is still displayed.) repeat the initiating a call process (steps 1-4).
- Still unsuccessful - ask the other party to initiate the call using your local or global address.
- If the connection is still unsuccessful, contact for Device vendor support.
A Secure Call
A videoconference call is encrypted when one of the following icons is visible on the screen (top right) during a call:
If the lock icons are not visible, the call is not secure.

Adjusting the Audio
Note: When the audio is muted, the connected site will not be able to hear you.

Ending a Call
- On the remote, press the red telephone handset button.

- The connected address will display with the option to End Call or Cancel.
- To end the videoconference call, select the red telephone handset (End Call) button and then press the OK Menu button.
- When the videoconference is disconnected, the main menu bar will appear on the monitor with the local image (i.e., image of the subject).
Troubleshooting
• Nothing displays on the screen - Make sure the power supply is connected to the Tandberg unit.
• Address does not display - Make sure the network cable is connected to the Tandberg unit.
• Local image (i.e., your image) does not display - Press the Layout button, on the remote.
• Additional help - Contact Device Vendor fro Support.
• Address does not display - Make sure the network cable is connected to the Tandberg unit.
• Local image (i.e., your image) does not display - Press the Layout button, on the remote.
• Additional help - Contact Device Vendor fro Support.
Comments