Add Floating Share Buttons To Your Blog

Hi Everyone those who looking for a great widget for social sharing of web site's & blog there is a good news. Now you can easily add floating share buttons like one in the floating in the left, very easily in 4 steps.

With This widget any visitor visiting your blog post can share the port on social networking sites like facebook, twitter, digg, stumbleupon etc. 

The user sharing your site on social networking sites or like it on FBwill drive more traffic to your website ,blog; this is because as your popularity grows share,like on social networks it will drive more traffic to your blog, so you should do all you can; to link your blog website to these social networking websites.

One good way of doing this is to add some nice share buttons to your blog. Share buttons allow your readers to easily share the contents of your blog or website with their friends on various social networking websites where they are members.

So we shall be adding some nice floating share buttons to your blog. what this floating share button does is to follow your visitors to any place they navigate to on your blog. To understand better, focus your eyes on
the right hand side of this page and scroll with your mouse. You will notice that some buttons are following you around saying "hey click me"   funny and nice right? ok let's add same to your blog.

I shall be using a blogger blog to illustrate but same procedures applies to wordpress blogs too.


  • Log in to your blogger account.
  • Click Layout under the name of the blog you are adding the floating share buttons.


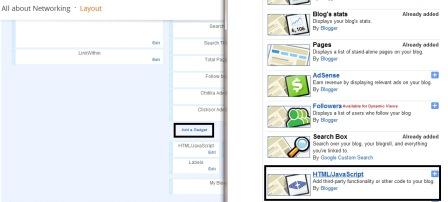
  • In the next page click Add Gadget, When the list of basic gadgets come up, select the HTML/JavaScript gadget.
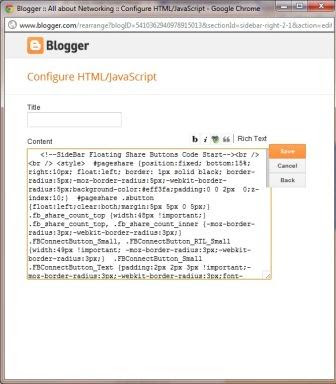
  • Now, copy the codes below and paste them into the body section of that gadget (leave the title field blank)

Copy Paste below code into your widjet.

    When you paste the codes, click Save and view your blog. you should see some
    share buttons following you everywhere you go.
    If you like this post, please use the comment form below to say THANKS.
    Enjoy!

    Comments

    Mathieu Deflem said…
    This one worked for me! Thanks. I wish to change the design though, but I will find that out. Thanks again.
    John Richards said…
    Thanks for Sharing this awesome script for floating widget.
    Regards,
    BeingSalmanKhan

    Popular posts from this blog

    INSTALL CISCO VPN CLIENT ON WINDOWS 10 (32 & 64 BIT). FIX REASON 442

    This article shows how correctly install Cisco VPN Client (32 & 64 bit) on Windows 10 (32 & 64 bit) using simple steps, overcome the ‘ This app can’t run on this PC ’ installation error , plus fix the Reason 442: Failed to enable Virtual Adapter error message . The article applies to New Windows 10 installations or Upgrades from earlier Windows versions and all versions before or after Windows 10 build 1511 .  To simplify the article, we’ve broken it into the following two sections: How to Install Cisco VPN client on Windows 10 (clean installation or upgrade from previous Windows), including Windows 10 build prior or after build 1511 . How to Fix Reason 442: Failed to enable Virtual Adapter on Windows 10 Figure 1. The Cisco VPN Client Reason 442: Failed to enable Virtual Adapter error on Windows 10 HOW TO INSTALL CISCO VPN CLIENT ON WINDOWS 10 (NEW INSTALLATIONS OR O/S UPGRADES) The instructions below are for new or clean Windows 10 inst...

    How to Disable SSL for Webmin

    Webmin is a Web application that enables administrators to manage Linux servers. Webmin runs on a Web server at port 10000. Miniserv is the name of the Web server application that handles the Webmin Web application. By default, Miniserv uses SSL. However, you can disable SSL for Webmin Miniserv by editing the configuration file for the Web application. With SSL disabled, you can access the Webmin application over a standard HTTP connection. Step 1 Open a terminal window on the Linux server. You can also SSH into the server if you do not have physical access to the machine. Step 2 Type the following command at the command prompt and press the “Enter” key: nano /etc/webmin/miniserv.conf This command opens the Miniserv configuration file in the Nano text editor.

    Error 651: How to Fix it in Windows 7/8

    If you are a windows user then it is possible that you have Face Error 651 Anytime. There are many windows user who get affected by this error code 651 while working online. If you are one of those windows user, then keep reading this article and carefully read out the following Detailed solutions which I have gathered after researching various websites, articles, forums etc. When using Windows 7 built-in PPPoE wizard with a modem working in bridge mode, it fails and error code 651 appears. The similar problem happens on Windows Vista or previous versions as well. For example, Error code 678 on Windows XP is equivalent to error code 651 on Windows 7. Error code 651 usually occurs when user tries to connect it’s broadband in windows 7 operating system. It shows a message that Your modem (or other connecting devices) has reported an error and Usually the message will be “Connection failed with error 651” .Fix Error 651 In such cases user tries to resta...