Customize and Deploy Windows 7 pre-configured and automatically (unattended installs) with the Windows Automated Installation Kit
In this section, you will learn how to customise and deploy Windows 7 so you, the OEM (Original Equipment Manufacturer) or the IT Administrator can deploy Windows 7 that meets your organisation's needs.
Want to build a Windows 7 Image which is pre-configured with the Windows components (such as the Windows Fax service) that you need? Do you want to include other browsers, brand applications, configure how setup will install on your workstations?
Whatever your needs are, read on www.atoz-networking.blogspot.com
to learn more from our blog which will teach you step-by-step customized deployment of Windows 7!
Step-by-Step Windows Automated Installation
First, you need to download the Windows 7 Automated Installation Kit (which also customises installs for Windows Server 2008 R2).
Anything missing? Contact us and get your comments/feedback and internet community tips/suggestions incorporated into this article!
For more information on customising the Unattended Setup File (to which there are dozens of components with customisable features), visit the Microsoft documentation at http://technet.microsoft.com/en-us/library/cc766052(WS.10).aspx
- Once downloaded and you have burned the ISO to DVD, run CDSetup.exe and launch the setup of the AIK (Automated Installation Kit) from the autorun.
- Once Installed, load the "Windows System Image Manager" from Start->All Programs->Microsoft Windows AIK.
- Insert your Windows 7 DVD (e.g. Windows 7 Enterprise or Windows 7 Professional) and navigate to the DVDROM Drive\Sources\ folder and copy the file "Install.wim" to you hard disk (e.g. C:\Windows7)
- Go to File -> Select Windows Image and select the file "Install.wim" located on your C:\Windows7 folder. (It needs to be on your hard disk as the file need write access!)

In this example, we will customise Windows 7 Professional. - On the File menu, click New Answer File. You now get a list of options in the "Answer File" pane.
- In the "Windows Image" Pane on the bottom left hand side, expand "Components";
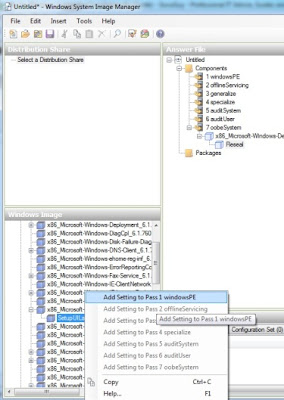
- In this step, we need to add a number of Windows System Components to the answer file, by right-clicking on the component and selecting the appropriate installation pass/phase (the list below tells you which pass to add them to). Passes you cannot add them to are grayed out. You can optionally add Internet Explorer, in Microsoft-Windows-IE-InternetExplorer to the pass "specialize".
Options to Add:
* Microsoft's recommendation uses a two-partition configuration. You do this by adding a second CreatePartition and a second ModifyPartition component to your answer file by right-clicking the component in the Windows SIM Windows Image pane, and then by selecting the appropriate configuration pass.ComponentPassMicrosoft-Windows-Deployment\ResealoobeSystemMicrosoft-Windows-International-Core-WinPE\SetupUILanguagewindowsPEMicrosoft-Windows-Setup\DiskConfiguration\Disk\CreatePartitions\CreatePartitionwindowsPEMicrosoft-Windows-Setup\DiskConfiguration\Disk\ModifyPartitions\ModifyPartitionwindowsPEMicrosoft-Windows-Setup\DiskConfiguration\Disk\CreatePartitions\CreatePartition *windowsPEMicrosoft-Windows-Setup\DiskConfiguration\Disk\ModifyPartitions\ModifyPartition *windowsPEMicrosoft-Windows-Setup\ImageInstall\OSImage\InstallTowindowsPEMicrosoft-Windows-Setup\UserDatawindowsPEMicrosoft-Windows-Shell-Setup\OOBEoobeSystemMicrosoft-Windows-Shell-Setup\OEMInformationspecializeMicrosoft-Windows-Shell-Setup\AutoLogonauditSystem - We now need to define all of these components as to how we want setup to deal with them. These settings vary from defining setup languages, to customising the Hard Disk Partition information.
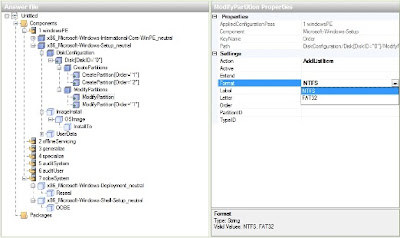
You need to define your settings from the table below. Be careful not to miss any! See the screenshot below for examples of how it should look like...
This screenshot is an example of the configuring the CreatePartition and ModifyPartition values:ComponentValueMicrosoft-Windows-International-Core-WinPEInputLocale = en-GBSystemLocale = en-GBUILanguage = en-USUILanguageFallback = en-GB
UserLocale =
UserLocale =
UserLocale = en-GB
(or it can be another language)Microsoft-Windows-International-Core-WinPE\SetupUILanguageUILanguage = en-US WillShowUI = OnErrorMicrosoft-Windows-Setup\DiskConfigurationWillShowUI = OnErrorMicrosoft-Windows-Setup\DiskConfiguration\DiskDiskID = 0WillWipeDisk = trueMicrosoft-Windows-Setup\DiskConfiguration\Disk\CreatePartitions\CreatePartitionOrder = 1Size = 200
Type = PrimaryMicrosoft-Windows-Setup\DiskConfiguration\Disk\CreatePartitions\CreatePartitionExtend = trueOrder = 2
Type = PrimaryMicrosoft-Windows-Setup\DiskConfiguration\Disk\ModifyPartitions\ModifyPartitionActive = trueFormat = NTFS
Label = System
Order = 1
PartitionID = 1Microsoft-Windows-Setup\DiskConfiguration\Disk\ModifyPartitions\ModifyPartitionFormat = NTFSLabel = Windows
Order = 2
PartitionID = 2Microsoft-Windows-Setup\ImageInstall\OSImageInstallToAvailablePartition =falseWillShowUI = OnErrorMicrosoft-Windows-Setup\ImageInstall\OSImage\InstallToDiskID = 0PartitionID = 2Microsoft-Windows-Setup\UserDataAcceptEula = trueMicrosoft-Windows-Setup\UserData\ProductKeyKey =WillShowUI = OnErrorOptional: Microsoft-Windows-IE-InternetExplorerHome_Page =Microsoft-Windows-Deployment\ResealForceShutdownNow = falseMode = AuditMicrosoft-Windows-Shell-Setup\OOBEHideEULAPage = trueProtectYourPC = 3Microsoft-Windows-Shell-Setup\OEMInformationManufacturer =HelpCustomized = false
SupportPhone =
SupportURL =
SupportHours =Microsoft-Windows-Shell-Setup\AutoLogonEnabled = trueLogonCount = 5
Username = Administrator
These settings outline a basic unattended installation in which no user input is required during Windows Setup. When the installation is complete, the computer will reboot to audit mode. Audit mode is a stage of Windows Setup that enables you to quickly boot to the desktop, install additional applications and device drivers, and test the installation. Windows Welcome does not run in audit mode, but it will run the next time the computer restarts, once you have run the sysprepcommand with the /oobe option. Windows Welcome, also called Machine OOBE (out-of-box experience), prompts the end user to read the Microsoft Software License Terms and to configure the computer. - Now go to Tools, and then click Validate Answer File; Keep an eye on the bottom right-hand-side "Messages" section. If no messages appear under "validation" then your install answer file is correct!
- Click on File -> Save Answer File. Save the answer file as Autounattend.xml.
- Copy the Autounattend.xml file to the root directory of a USB flash drive
- Turn on the your test computer and insert the Windows 7 product DVD and have the USB Stick containing the answer file you created inserted into the Primary USB port. (On a Desktop this is any of the back USB Ports, on a laptop usually any will do).
- Voila - Windows 7 Setup should now be reading the answer file and installing itself based on your answer-file settings!

Anything missing? Contact us and get your comments/feedback and internet community tips/suggestions incorporated into this article!
For more information on customising the Unattended Setup File (to which there are dozens of components with customisable features), visit the Microsoft documentation at http://technet.microsoft.com/en-us/library/cc766052(WS.10).aspx
Common Windows 7 Unattended Installation Setup Errors
- Q> When you launch Windows 7 Setup, you are still presented with EULA and welcome instead of setup being automated.
A> Either you have a problem with the Autounattend.xml (Make sure it is called this! Unattend.xml is post-disk partitioning for setup!) like the installer language specified in your Autounattend.xml is wrong/not supported or it cannot be found. It must be placed on the root of a USB Stick, Floppy Disk, or the root of the DVD Install media (not in sources folder!); - Q> I keep getting an Installation was canceled error "Windows could not apply unattend settings during pass [offlineServicing]", as pictured below:

A> This occurs if you have added the "Windows Foundation" or "Windows LanguagePack" packages which are configured wrongly such as missing vital system components etc. Remove these configurations from your Autounattend.xml and place them in Unattend.xml which is applied after WinPE install phase. - Q> I get during Windows 7 Setup Installation "Windows cannot be installed in the selected partition. Installation requires at least 5722MB of free space. To Install Windows, free additional space and restart the installation". This percuiliar message appears mid-way through the Installation Setup stage "Expanding files".
A> This is particularly annoying since you probably do have over 5.7GB of free space. I found this happened inside Virtual Machines with C Partitions of even 8GB in size, which should be more than enough to accomodate the 200MB system partition and the Windows partition. However, the answer is easy, make sure you have a hard disk partition/size of at least 10GB or more - then it shall work fine. I know, strange Windows 7 Setup does not honour 8GB in size. Perhaps they will fix this in future service packs.


Comments