How to create a custom Windows7 DVD with Service Packs Hotfixes included
In this guide, you will learn how to create your customized Windows 7 setup, using the autounattend.xml setup answer file your created on Customize Windows 7 Deployment guide.
Do you want to build a Windows 7 DVD which is pre-configured to your needs, saving valuable setup time? Do you want to include other programs, the latest setup hotfixes and service packs?
Whatever your needs are, read on to learn more from our website who will teach you step-by-step creation of your customized Windows 7 DVD!
Step-by-Step creation of custom Windows 7 DVD
Pre-Requisites
- Windows 7 Customized setup folder on your Hard Disk (e.g. C:\Windows7) (e.g. A copy of your original Windows 7 DVD on your Hard Disk)
- CD Image GUI (free) by CyBerian. (Download here);
- ISO Buster (free) to extract your Windows 7 DVD Boot Image;
- Optionally, an Autounattend.xml file created in your Windows Automated Installation Kit to install Windows 7 customized to your needs;
- Optionally, an $OEM$ folder inside the Windows 7 "Sources" folder to add additional files to the system folders, hard disk and program files etc.
- Optionally, any latest service pack or hotfixes from Microsoft you would like installed.
Guide
- Firstly, you need to ensure you have copied the contents of your original Windows 7 DVD (e.g. Windows 7 Professional) to your hard disk, e.g. C:\Windows7
- Then, whilst the DVD is in your drive, we need to extract the bootable image file that enables the Windows 7 DVD to be booted on a PC, straight after the BIOS. You can still create a DVD without this, but you will only be able to launch the windows setup from within an existing installation of Windows. To extract the boot image, download ISO buster from the link above, and install it;
- Under the tree structure within ISO Buster, you should see "Bootable Disc" under Session1->Track1. Click this heading as below:
- Right click on the "Microsoft Corporation.img" file and select "Extract Microsoft Corporatation.img";
- Save the file to your hard disk, perhaps just under C:\
- Now we have the boot image, close ISO Buster. Think about purchasing this tool it is well worth it! Now, we need to add the files we need into the Windows 7 Setup image. In your folder on your hard disk, copy the Autounattend.xml file and place it to your ROOT directory of your Windows 7 DVD folder. E.g. If everything is copied to C:\Windows7 (so sources folder is in C:\Windows7\Sources), copy the Autounattend.xml to c:\Windows7. Also, use the Microsoft Automated Installation Kit (AIK) to install other drivers and programs, which create an $OEM$ folder in the "Sources" directory.
- If you wish to include Hotfixes or Windows 7 Service Packs, create a folder in the root of your hard disk directory "Updates" e.g. C:\Windows7\Updates. In here, place all of the .MSU files which will be installed as one of the steps during the Windows 7 setup!
- If you wish to include custom files to include in the Windows 7 installation (such as files in the program files, system32 folder, OOBE (Out Of Box Experience) etc.) then make a folder called $OEM$ inside the sources folder. From there, the following folder structures must apply (many changed from Windows 2000 and Windows XP $OEM$ days):
\$$
|
Contains files that Windows Setup copies to the
%WINDIR% (for example, C:\windows) folder during installation.
|
\$$\System32
|
Contains files that Windows Setup copies to the
%WINDIR%\System32 folder during installation.
|
\$1
|
Represents the root of the drive on which you
installed Windows (also called the boot partition) and contains files that
Windows Setup copies to the boot partition during installation.
|
\$1\Pnpdrivers
|
Contains new or updated Plug-and-Play (PnP)
drivers. The user specifies the folder name in the Unattend.xml file for
unattended installations. For example, this folder might be named \$OEM$
Folders\$1\Pnpdrvs.
|
\drive_letter\subfolder
|
A subfolder of the drive that contains files that
Windows Setup copies to the subfolder during installation. Multiple instances
of this type of folder may exist under the \$OEM$ Folders\drive_letter folder,
for example, \$OEM$ Folders\D\MyFolder.
|
\TEXTMODE, \$Progs\Internet Explorer, \$Progs, \$Docs, \$1\SysPrep, \$$\Help
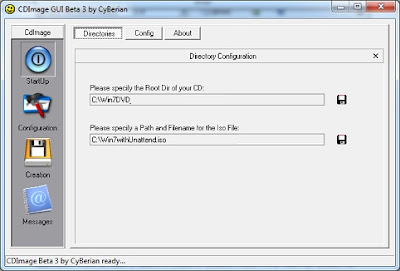
- Install CDImage GUI from the link in the "pre-requisites" above and once installed start your application. Here we need to specify a couple of screens. Firstly in the "start-up" screen, we need to specify the "Root Dir" of your CD as your hard disk location of your customised Windows 7 setup;
- Then, specify the destination ISO file of your new Windows 7 DVD, e.g. c:\Windows7.iso, as below:
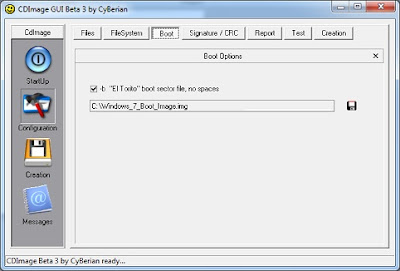
- Now, we need to go to the "Configuration" screen by clicking on the button on the left-hand column. Under the "Boot" tab, specify your "Microsoft Corporate.img" boot image that you extracted in ISO buster in step 5 as below:
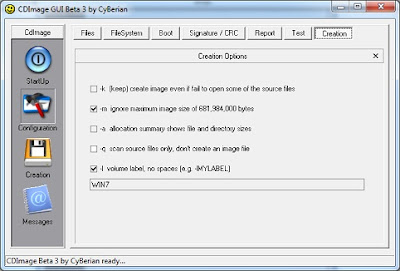
- Now, click the "Creation" tab to make sure two things are set: Firstly the "Ignore maximum image size..." is ticked, and the volume label has something entered as per below:
.jpg)
- Now we can move over to the Creation page via the button on the left-hand column. Here we need to generate the ISO. Click the button "Start image creation" to start the progress, you will see it starts to build your new Windows 7 ISO image from the files on your hard disk:
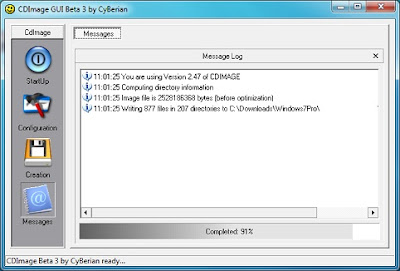
- Once the CDImage GUI Progress Bar reaches 100%, you can close it and burn to DVD your new ISO fil in C;\Windows7!
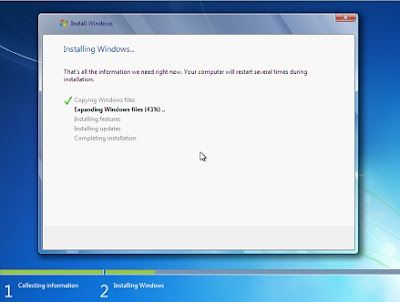
- Voila - you now have a customised, bootable Windows 7 DVD! Boot from the DVD and you should see Windows 7 installing automatically to your exact requirements!

Comments