
Windows Live Movie Maker-trim multiple parts of same video

When using Windows Live Movie maker to create videos at home, one of the biggest problem is to produce a final video which has only parts of the original video. This is specially required when you want your final video to only showcase best moments of a long video.
Windows Live Movie Maker does have split feature which you can use to split videos and then remove what is not required but below is a much easier way to achieve it. We will use two things :
  • Trim Tool : This tool allows you cut a particular section of a movie.
  • And Windows Live Movie maker has no restriction on how many times you can add a video. So if you have 10 moments to be captured, add the video ten times.
How to trim :
  • Select the first video and go to Video Tools which will be highlighted as soon as you select the video.
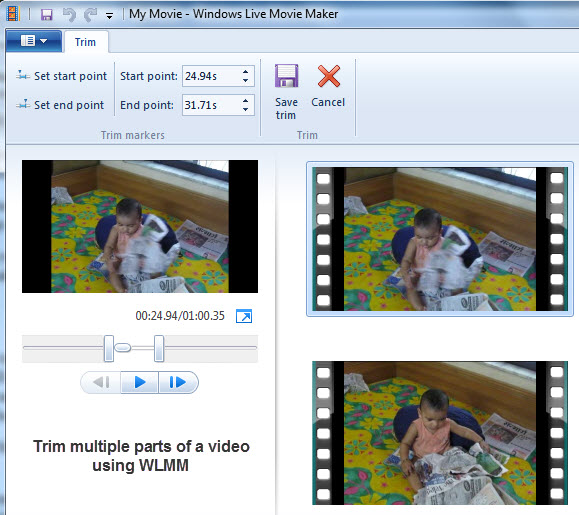
  • Select Trim Tool and you will see horizontal bar displayed right under the video preview
  • Now drag the bars from left and right to the best video moment and click on Save Trim.
  • You can also use Start and End Point Time if you want to be more accurate.
Repeat the same thing with rest of the videos ( which is actually the same video ). Once you done all you need is to produce the video and your final video will have parts which you wanted.

Apart from being much faster and accurate there is one more advantage of trimming this way, Anytime you want to change the trimmed portion you can do it i.e. Movie Maker actually marks that this part is trimmed and is reflected only when you produce a video.
So any moment you want to change the trimmed portion, click the video, click Trim Tool and you will see the markings right there.

Comments

Popular posts from this blog

INSTALL CISCO VPN CLIENT ON WINDOWS 10 (32 & 64 BIT). FIX REASON 442

This article shows how correctly install Cisco VPN Client (32 & 64 bit) on Windows 10 (32 & 64 bit) using simple steps, overcome the ‘ This app can’t run on this PC ’ installation error , plus fix the Reason 442: Failed to enable Virtual Adapter error message . The article applies to New Windows 10 installations or Upgrades from earlier Windows versions and all versions before or after Windows 10 build 1511 .  To simplify the article, we’ve broken it into the following two sections: How to Install Cisco VPN client on Windows 10 (clean installation or upgrade from previous Windows), including Windows 10 build prior or after build 1511 . How to Fix Reason 442: Failed to enable Virtual Adapter on Windows 10 Figure 1. The Cisco VPN Client Reason 442: Failed to enable Virtual Adapter error on Windows 10 HOW TO INSTALL CISCO VPN CLIENT ON WINDOWS 10 (NEW INSTALLATIONS OR O/S UPGRADES) The instructions below are for new or clean Windows 10 inst...

How to create a Hirens Boot CD 15.2 USB Disk

Hiren’s BootCD (HBCD) is a bootable CD that contains a set of tools that can help users to fix their computer if their system fails to boot. More specifically, HBCD contains hardware diagnostic programs, partition tools, data recovery utilities, antivirus tools and many other tools to fix your computer problems.  I write this article because I use Hiren’s BootCD frequently to troubleshoot computer problems, specially when a computer doesn’t boot anymore due to a virus attack or due to a corrupted file system. In this article you will find instructions on how to put Hiren’s BootCD on a USB flash drive (stick) in order to troubleshoot computer problems in the future.

Internet Connection Sharing has been disabled by the Network Administrator. (Solved)

Problem: Logged in to computer with domain account has administrator privileges, and wanted to share my computer’s wifi to my mobile phone. When open the network sharing dialog, the dialog says: Internet Connection Sharing has been disabled by the Network Administrator.